Monday, March 24, 2014

Good Morning all! It's been a long time since my last post. It's been a LONG Winter for everyone!
I made this card for a friend of mine. We call her Aunt Ginny. She was turning 90 years old and just loves when I send her a card. I added a wobble behind the cute little dog.
 I used my Print and Cut Design ID #54458 from Silhouette.com and cut it out on my Silhouette and I put one on the card so when you wobble the doggie you can see it behind. I added a strip of patterned pink paper that I punched and then added a piece of pink glitter ribbon on top of that. I also used my Silhouette to write out Happy Birthday and cut out the label. I used 2 skittles on each side.
 I put the Purple piece of card stock thru my Cuttlebug using the basket weave folder.

 Inside I used all the same colors but I turned them on different angles. I printed out the sentiment on my Silhouette. Then I used my Wink Of Stella Brush to make the Birthday shine and sparkle. I also used more of the Skittles.


Thank you for visiting my blog.
Have a great week!
 
Kathy 
 
Entered in :
 
Exploring Cricut and More


Wednesday, September 25, 2013

EXPLORING CRICUT
Baptism Layout
Welcome everyone!  Glad you could join me today for this weeks Design Team daily project at Exploring Cricut. http://exploringcricut.blogspot.com/

Sorry I have been away for so long. I have been under the weather an unable to get any of my crafting done. But, I'm back!
~~~~~~~~~~~~~~~
Today, I am sharing a 12" x 12" layout I made for my daughter for her new baby for her Baptism. I hope you enjoy!
I cut out all of my pieces with my Cricut Expression and started by making my roses. (After I took the photo I fixed the open spaces you can see thru the roses by using some spray inks). I made the frames by using rectangles found on many cartridges. I sized them and then welded them to make a frame. I added a couple swirls I found and welded them into the frame. I then added tiny pink gems to add some bling.
 
 I cut the crosses from the Ultimate Creative Sampler Cartridge starting at 1.5" and making each one larger by 1/4 of an inch. I inked around the sides to age the crosses. I used pop dots to add dimension to it. Then I added the bling. I made the rose buds from the cartridge Formal Occasion. I just cut the bud and used a couple pop dots to round my bud around. I cut the large corner vines from the CTMH- Art Philosophy Cart. I added a few hearts to the vine. My leaves were cut from the cart Mother's Day Bouquet.
The photo in the top left corner was part of the invite for the baptism that I made for the occasion.
 A photo of her in her dress will be added before it is given to my daughter. I hope you have enjoyed my project today.  


Things I used:
My Cricut Craft Room
Cricut Cartridges - CTMH - Art Philosophy, Formal Occasions, Mother's Day Bouquet and Ultimate Creative Sampler
Scotch ATG Adhesive
Pop Dots
Zip Dry Adhesive
Gel Pens - White
Ink Memento light brown ink
Cardstock - Cricut 12"x 12"Red and White, Cricut White Textured paper The background papers were from my stash.
Clear swirl bling

Don't forget that every day, each one of the designers has a Cricut creation to share with you.  We hope to inspire you to explore your Cricut cartridges and have lots of fun doing it!!  Be sure to pop by http://mycricutcraftroom.blogspot.com/
everyday and be prepared to be amazed!
Thanks for dropping by today! Have a great day! God Bless!

Kathy  ©


Wednesday, September 11, 2013

Christmas Card- Exploring Cricut
 
Welcome everyone!  Glad you could join me today for the this weeks Design Team daily project at Exploring Cricut. http://exploringcricut.blogspot.com/
 
 
I used Cricut Cartridges Creative Memories - Tis the Season and CTMH - Art Philosophy. I made a Christmas Card.
 
 . My card is 5" x 7". I cut the base at 10" x 7" using blue polka dotted card stock. I cut out the following layer at 4.75" x 6.75". I rounded all of the edges and cut out the center layer with my Cricut using CTMH - Art Philosophy cartridge at 5" and put thru my Cuttlebug and used the Darice Snow Flake Embossing folder.
 I cut the banners at 4.5" on the blue polka dotted paper and the white at 4.25". I added two sparkly blue brads from my stash. I used foam tape to add dimension to the banner.
 . I added ribbon to the center striped layer and then attached it to my card layer. I added the top layer with a few pop dots and then added the banner.
 . I used my white gel pen to add snow to the trees and then used my Memento markers to make the highlighting. I then pop them up with pop dots and added a bow.


Inside I stamped my sentiment in Memento Teal Zeal ink. I added a bow and finished up the card. I hope you have enjoyed my Christmas card.

What I used:
My Cricut Craft Room
Cricut Cartridges - Creative Memories - Tis the Season and CTMH- Art Philosophy
ATG
Zip Dry Adhesive
Pop dots
Foam Tape
Stamp Set - Close to My Heart stamp set
Card Stock - Core Impressions Textured Paper (Card base), Recollections 12x12 and Cricut Textured White
Teal Offray Ribbon 3/16"
Memento Marker - Cottage Ivy
Ink - Memento Tuxedo Black and Teal Zeal

Don't forget that every day, each one of the designers has a Cricut creation to share with you.  We hope to inspire you to explore your Cricut cartridges and have lots of fun doing it!!  Be sure to pop by http://mycricutcraftroom.blogspot.com/
everyday and be prepared to be amazed!
 
Thanks for dropping by today! Have a great day! God Bless!
 
Kathy  ©
 
Thanks for dropping by today! I hope you had fun!
Have a great day!
 

Monday, September 9, 2013

 My Cricut Craft Room Turkey Teddy Bear
Welcome to Kathy's Corner
Today is Monday and the theme is Teddy Bears.

http://mycricutcraftroom.blogspot.com/

I started today's project by using Cricut Cartridge Teddy Bear Parade.
 I just love the Teddy Bear all dressed up in it's little Turkey suit. I cut this little Teddy at 3". I used a 5" x 7" kraft colored card base. I added 2 layers

the 1st one is 4.75" x 6.75" and the top one is 4.50" x 6.50". I added a couple pieces of yellow ribbon and a bow. I also made a sign reading Eat Ham. I did not know what I wanted this card for so I just made it a general use card so I could use it this fall some time. 

Thank you for joining me today.

What I used:
My Cricut Craft Room
Cricut Expression
Cricut Cartridges - Teddy Bear Parade
ATG Adhesive   
Zip Dry Adhesive
Gel Pens - White
Black - Cricut 12" X 12"

Don't forget that every day, each one of the designers has a Cricut creation to share with you.  We hope to inspire you to explore your Cricut cartridges and have lots of fun doing it!!  Be sure to pop by the blog http://mycricutcraftroom.blogspot.com/
 everyday and be prepared to be amazed!
 Kathy  ©

Thanks for dropping by today! Have a great day!

Saturday, September 7, 2013

My Cricut Craft Room's September 100 Cricut Cartridge Blog Hop 


Welcome to My Cricut Craft Room's September 100 Cricut Cartridge Blog Hop 
Collectively the design team and guest designers use over 100 different Cricut Cartridges in their projects during this hop.  

I have made these great projects to share with you today. I used the following Cricut cartridges
Creative Memories - Tis the Season
CTMH - Art Philosophy
Baby Shower
Autumn Celebrations
Freshly Picked
Mothers Day Bouquet
Spring Cottage
Flower Shoppe
First I will start with my Flowering Pocket Card. I used the Cricut Cartridges Freshly Picked, Mothers Day Bouquet, Spring Cottage and Flower Shoppe. I made a card with a pocket. First I started by making the roses. I wanted to try something difference so I cut out the petals with the Flower Shoppe cartridge. I cut the petals at 1.75"and 1.63". I also cut out a heart at 1.63" for the center of the rose. I then spritzed the heart with water and let the water penetrate the paper a few seconds. I then tightly wrapped the heart into a cone.


Using the end with the tightest end for the center....I then spritzed a few smaller petals and wrapped them around the center, holding the bottom edges to keep it all together, At times, I need a few more hands or fingers. I used 3 petal for the first row. Then I went to the larger petals and again spritzed them. I carefully added each petal leaving them a little more loose. I shaped each petal as I went. 

 When I got the look and size I wanted I would wrap the bottom of the paper rose with flower tape and I used Kleenex and cotton balls to support each rose until dry. When dry I cut off the bottom and re wrapped each rose to make a nice finished look. I was surprise how hard the petals were when
they dried. I cut 2 flower pots with my Cricut at 6.75" on a dark orange card stock. I used some of my brown ink and a sponge to age the flower pot. I carefully glued the back side edges of each pot and put together to leave an opening.

 I then cut out the rest of the flowers and put my flowering pocket card together. I measured the flower pot and hand cut a piece of paper to slip between the 2 flower pots. I slipped the paper into the flower pot and built the flower arrangement.


 I stamped the message inside and the banner and finished up. I hope you enjoyed my project today. I really liked this when it was all finished. What do you think?

What I used:
My Cricut Craft Room
Cricut Cartridge - Freshly Picked, Mothers
Day Bouquet, Spring Cottage and Flower Shoppe.
Scotch ATG Adhesive
Zip Dry Adhesive
Gel Pens - Silver
Zig 2 Way Glue
Paper - Bazzill Basics Paper T2-211 Ruby Red and 12" x 12" Cricut Card Stock from my stash
Pop Dots Dimensional
Ink - Memento Tuxedo Black, Plum, Cottage Ivy, Dandelion and Rich Cocoa.
Stamps - "Thanks A Bunch" and from Rubbernecker Stamps - "Hope Your Day Blooms
With Special Joy"
Brad - Rose
Glitter - Extra Fine Yellow
Ribbon - Pink from my stash
~~~~~~~~~~~~~~~~~~~~~~~~~~~~~~~~~~~~~~~~~~~~~~~~~~~~~~~~~~~~~~~~~~~~~~~~
For my next project I used Cricut Cartridges Creative Memories - Tis the Season and CTMH - Art Philosophy. I made a Christmas Card. My card is 5" x 7".


I cut the base at 10" x 7" using blue polka dotted card stock. I cut out the following layer at 4.75" x 6.75". I rounded all of the edges and cut out the center layer with my Cricut using CTMH - Art Philosophy cartridge at 5" and put thru my Cuttlebug and used the Darice Snow Flake Embossing folder. I cut the banners at 4.5" on the blue polka dotted paper and the white at 4.25".
 I added two sparkly blue brads from my stash. I used foam tape to add dimension to the banner. I added ribbon to the center striped layer and then attached it to my card layer.
 I added the top layer with a few pop dots and then added the banner. I used my white gel pen to add snow to the trees and then used my Memento markers to make the highlighting. 
I then pop them up with pop dots and added a bow. Inside I stamped my sentiment in Memento Teal Zeal ink. I added a bow and finished up the card. I hope you have enjoyed my Christmas card.
What I used:
My Cricut Craft Room

Cricut Cartridges - Creative Memories - Tis the Season and CTMH- Art Philosophy
Scotch ATG Adhesive
Zip Dry Adhesive
Pop dots
Foam Tape
Stamp Set - Close to My Heart stamp set
Card Stock - Core Impressions Textured Paper (Card base), Recollections 12x12 and Cricut Textured White
Teal Offray Ribbon 3/16"
Memento Marker - Cottage Ivy
Ink - Memento Tuxedo Black and Teal Zeal

~~~~~~~~~~~~~~~~~~~~~~~~~~~~~~~~~~~~~~~~~~~~~~~~~~~~~~~~~~~~~~~~~~~~~~~~~~~~~~~~~~~~~~~~~~~~~~~~~~~~~~~~~~~~~~~~~~~~~~~~~~~~~~~~~~~~~~~~~~

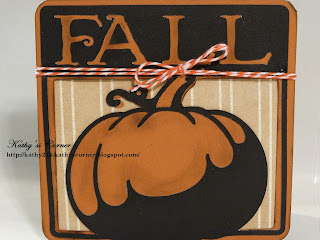
My last project is a fall card. I used a Cricut Craft Room Exclusive Autumn Celebrations.
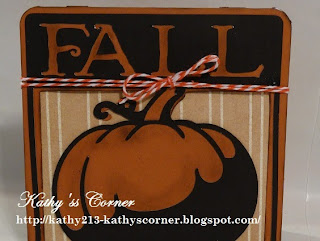
I cut the card at 5" x 10"  with a dark gold card stock from my stash. I then cut the top layer at the same size but in black Crciut Card Stock. Before cutting I added the word FALL to the top of the card. I then inked my card and layer and put together.I added twine and tied a bow.  Easy peasy. This was the easiest card I have ever made but, I love how it turned out. I am glad I cut out a bunch before the free week was over. I would love this cartridge!


What I Used:
My Cricut Craft Room
Cricut Cartridges - Cricut Craft Room Exclusive Autumn Celebrations
Scotch ATG Adhesive
Paper - Cricut Black Card Stock

Ink - Memento Tuxedo Black 

That's it for me today. Please follow our hop by continuing on below.


Next you should go to Vivi's Blog


If you get lost along the way here is the entire line up

Start Here- http://mycricutcraftroom.blogspot.com/
...


Thank you for joining us on the September 100 Cricut Blog Hop.

Kathy  ©
 I hope you had fun!  Have a great day! God Bless!


Wednesday, August 28, 2013


Pocket Card - My Cricut craft Room

Welcome to Kathy's Corner

Today the design team was challenged to make a project was to use a Pocket or Envelope. Check it out below.  
 
Welcome everyone! Glad you could join me for today's project at My Cricut Craft Room.
I used the Cricut Cartridges Freshly Picked, Mothers Day Bouquet, Spring Cottage and Flower Shoppe. I made a card with a pocket.

 First I started by making the roses. I wanted to try something difference so I cut out the petals with the Flower Shoppe cartridge. I cut them at 1.75"and 1.63". I also cut out a heart at 1.63" for the center of the rose. I then spritzed the heart with water and let the water penetrate the paper a few minutes.
 I then tightly wrapped the heart into a cone. Using the end with the tightest end for the center....I then spritzed a few smaller petals and wrapped them around the center, holding the bottom edges to keep it all together, I think I need a few more hands or fingers at times.
 I used 3 petal for the first row. Then I went to the larger petal and again spritzed them. I carefully added each petal leaving them a little more loose. I round the edges of each petal as I went. When I got the look and size I wanted I would wrap the bottom of the paper rose with some flower tape and I used Kleenex to lay them in so they would stay standing and the edges would not smash.
 When dry I cut off the bottom and re wrapped each rose to hold everything together. I was surprise how hard the petal were when they dried. I then cut out the rest of the flowers and put all of them together. I also cut the flower pot out. I used a dark orange card stock and used a brown ink to give it age and color.

 I put everything together and slipped the message into the flower pot and built the flower arrangement. I stamped the message inside and the banner and finished up.

  Often I add a gift card or some cash into the message. I left I thin slot up under the flowers on this message piece to place the gift card or money. I hope you enjoyed my project today. I really liked this when it was all finished. What do you think?


What I used:
My Cricut Craft Room
Cricut Cartridge - Freshly Picked, Mothers Day Bouquet, Spring Cottage and Flower Shoppe.
Scotch ATG Adhesive
Zip Dry Adhesive
Gel Pens - Silver
Zig 2 Way Glue
Paper - Bazzill Basics Paper T2-211 Ruby Red and 12" x 12" Cricut Card Stock from my stash
Pop Dots Dimensional
Ink - Memento Tuxedo Black, Plum, Cottage Ivy, Dandelion and Rich Cocoa.
Stamps - "Thanks A Bunch" and from Rubbernecker Stamps - "Hope Your Day Blooms With Special Joy"
Brad - Rose
Glitter - Extra Fine Yellow
Ribbon - Pink from my stash
 Don't forget that every day, each one of the designers has a Cricut creation to share with you.  We hope to inspire you to explore your Cricut cartridges and have lots of fun doing it!!  Be sure to pop by the blog http://mycricutcraftroom.blogspot.com/
everyday and be prepared to be amazed!
Kathy  ©
 Thanks for dropping by today! I hope you had fun!
Have a great day! God Bless!


Heart Poem- Exploring Cricut
 Welcome everyone!  Glad you could join me today for the this weeks Design Team daily project at Exploring Cricut. http://exploringcricut.blogspot.com/


Today I decided to do something a little different. I wanted to use some of the vinyl I purchased from Crciut.com 

I started by purchasing a 12"x12" Canvas on a wooden frame. I painted my canvas with 2 layers of White Acrylic paint. I then cut my vinyl letters at 1" from the CTMH - Art Philosophy cartridge and the Hearts were cut at 1.3".


I hope you have enjoyed my project.
 
What I used:
My Cricut Craft Room
Cricut Cartridges - CTMH - Art Philosophy
Cricut Vinyl - Black and Light Pink
Don't forget that every day, each one of the designers has a Cricut creation to share with you.  We hope to inspire you to explore your Cricut cartridges and have lots of fun doing it!!  Be sure to pop by http://mycricutcraftroom.blogspot.com/
everyday and be prepared to be amazed!
Thanks for dropping by today! Have a great day! God Bless!
 
Kathy  ©